Description
Make your stepper motor move exactly where you want.
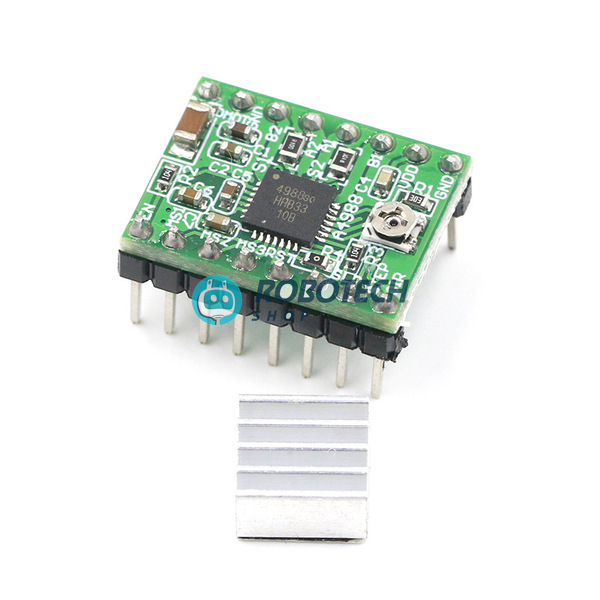
The A4988 turns two simple Arduino signals, STEP and DIR, into smooth, precise motor movement. It is the driver inside millions of 3D printers, CNC machines and robot arms, and it comes with a heatsink.
Pick a microstep mode
Three pins decide how finely the driver divides each step. Choose a mode to see the steps per turn for a standard 1.8° NEMA 17 motor.
Leave the three pins unconnected for full step. Higher divisions give smoother, quieter motion.
Specifications
| Model | A4988 stepper motor driver module (green board) |
|---|---|
| Driver chip | Allegro A4988 DMOS microstepping driver |
| Motor supply (VMOT) | 8V to 35V DC |
| Logic supply (VDD) | 3V to 5.5V, works with 3.3V and 5V boards |
| Output current | Up to 2A per coil with a heatsink and good airflow. About 1A without extra cooling. |
| Microstepping | Full, 1/2, 1/4, 1/8 and 1/16 step |
| Motor type | Bipolar stepper motors, such as NEMA 17 |
| Current control | On-board trimmer potentiometer |
| Protection | Over-temperature shutdown, cross-current protection, under-voltage lockout |
| Size | About 15 × 20 mm, same pin layout as the standard A4988 board |
| In the box | 1 × A4988 driver module, 1 × heatsink |
Pinout
| VMOT, GND | Motor power, 8–35V. Add a 100 µF capacitor close to these pins. |
|---|---|
| 2B, 2A, 1A, 1B | Motor coils. One coil goes to 1A and 1B, the other to 2A and 2B. |
| VDD, GND | Logic power from your Arduino, 3V to 5.5V |
| STEP | Each pulse moves the motor one step |
| DIR | High or low sets the rotation direction |
| MS1, MS2, MS3 | Microstep mode select |
| ENABLE | Low turns the outputs on. Leave it unconnected to keep them on. |
| RESET, SLEEP | Connect these two pins together so the driver stays awake |
What you can build
If it moves in exact steps, the A4988 can drive it.
3D printer
The classic use. Fits RAMPS 1.4 boards, so you can replace or add a driver for any axis.
Mini CNC and laser engraver
Use it with the CNC Shield V3 and Arduino UNO for a small desktop machine.
Camera slider
Smooth time-lapse and video moves.
Robot arm
Precise joint angles from standard NEMA 17 motors.
Automatic curtain or dispenser
Open, close and measure out exact amounts.
Pen plotter
Draw and write with two motors and a pen lift.
Wiring it to Arduino UNO
| A4988 pin | Connect to |
|---|---|
| VDD | Arduino 5V |
| GND (logic side) | Arduino GND |
| STEP | Arduino pin D3 |
| DIR | Arduino pin D2 |
| ENABLE | Arduino pin D8 (optional) |
| RESET and SLEEP | Connect to each other |
| VMOT and GND (motor side) | Motor supply, 12V is common, plus a 100 µF capacitor across the two pins |
| 1A, 1B, 2A, 2B | Stepper motor coils |
Important: always connect the motor before switching on the power, and never unplug the motor while the board is powered. Doing so can destroy the driver. Also join the grounds of the Arduino and the motor supply.
Basic Arduino code
This sketch turns the motor one full revolution one way, waits, then turns it back. It assumes a 1.8° motor (200 steps per turn) with the MS pins left unconnected.
const int stepPin = 3;
const int dirPin = 2;
const int enPin = 8;
void setup() {
  pinMode(stepPin, OUTPUT);
  pinMode(dirPin, OUTPUT);
  pinMode(enPin, OUTPUT);
  digitalWrite(enPin, LOW);   // LOW = driver on
}
void loop() {
  digitalWrite(dirPin, HIGH); // one direction
  for (int i = 0; i < 200; i++) {
    digitalWrite(stepPin, HIGH);
    delayMicroseconds(1000);
    digitalWrite(stepPin, LOW);
    delayMicroseconds(1000);
  }
  delay(1000);
  digitalWrite(dirPin, LOW);  // other direction
  for (int i = 0; i < 200; i++) {
    digitalWrite(stepPin, HIGH);
    delayMicroseconds(1000);
    digitalWrite(stepPin, LOW);
    delayMicroseconds(1000);
  }
  delay(1000);
}
To spin faster, reduce the 1000 microsecond delays. To use 1/16 microstepping, connect MS1, MS2 and MS3 to 5V and change 200 to 3200 steps per turn.
Set the motor current first
Turn the small trimmer on the board to set the current limit. Check the marking on the small current-sense resistors (for example R050, R068 or R100) and use: Vref = current × 8 × resistor value. For a 0.1 Ω resistor, a 1A limit means about 0.8V. Measure Vref between the trimmer’s metal top and GND with a multimeter. Set the current at or just below your motor’s rated current, and always use the heatsink.
Questions buyers ask
Is the A4988 compatible with Arduino?
Yes. It needs only two signal pins, STEP and DIR, so it works with Arduino UNO, Nano and Mega. It also plugs into CNC Shield V3 and RAMPS 1.4 boards.
Which motors can I use?
Bipolar stepper motors with 4, 6 or 8 wires, such as NEMA 17. For 6-wire motors, use only the two outer wires of each coil.
Do I need the heatsink?
Yes, for anything above about 1A. Stick the heatsink on the chip. For 2A, add a fan as well.
My motor only vibrates and does not turn. What is wrong?
Most often, one coil is connected to the wrong pins. Use a multimeter to find the two wire pairs of the motor and connect one pair to 1A/1B and the other to 2A/2B. Also check that RESET and SLEEP are joined, and that the current is not set too low.
What power supply should I use?
A 12V supply with at least 2A is a good start for one NEMA 17 motor. Do not go above 35V, and add a 100 µF capacitor across VMOT and GND.
Can I connect the board to a 3.3V board like ESP32?
Yes. The logic side accepts 3V to 5.5V, so ESP32 and Raspberry Pi Pico signals work.
Do you deliver outside Dhaka?
Yes
Related searches
English: A4988 stepper motor driver price in Bangladesh, A4988 driver module BD, A4988 with heatsink Dhaka, stepper motor driver Arduino Bangladesh, NEMA 17 driver BD, 3D printer driver module Bangladesh, CNC shield A4988 BD, Arduino stepper motor project Bangladesh, robotics shop Bangladesh, electronics shop Dhaka
Banglish: A4988 driver dam koto, stepper motor driver kothay pabo, A4988 stepper driver price BD, 3D printer driver module kinbo kothay, Arduino shop Dhaka, CNC project driver BD
বাংলা: স্টেপার মোটর ড্রাইভার দাম, A4988 ড্রাইভার মডিউল, ৩ডি প্রিন্টার ড্রাইভার বাংলাদেশ, আরডুইনো স্টেপার মোটর কন্ট্রোল, রোবোটিক্স শপ ঢাকা